Router listing is where you can search for routers, and provides access to backups, firmware, fleet commander, security, and login manager.
Router Grouping #
Learn how to organize routers using grouping.
Search #
Search for your router by name, tags, package, model, identity, notes, management ip, ether1mac, IP or serial number.

Sort & Filter #
Click the Column header to set sort order. Click the funnel icon in the Tags column to filter the view to show only routers with those tags.
View, Add, and Edit your Routers #
The Router List page is your first stop when it comes to adding your routers to Admiral. Once you add a router, you can see if it is online or offline, enable backups, run a speedtest, edit settings, and more.
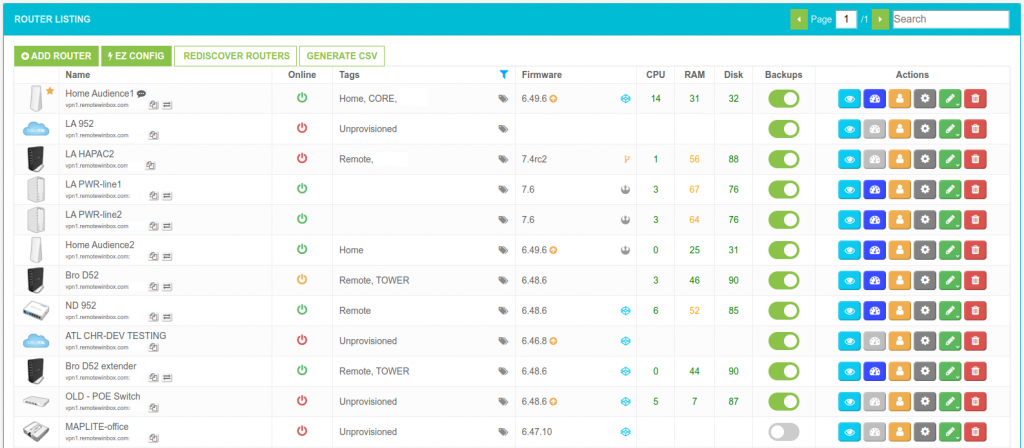
Name #
This is the name you chose when you added the device to your database.
 #
#
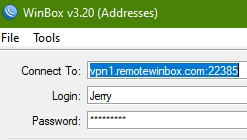
IP #
This is the IP you will use to connect to the device using WinBox. You will place this information along with the Port into the Connect To: field of WinBox
Port #
Remote WinBox will automatically assign a port for use with the IP. You will combine these to enter into WinBox. The resulting string will look like this: vpnX.remotewinbox.com:XXXXX (X will be a number that is automatically created by Remote WinBox and cannot be changed by the user)
Status #
The device status will be either Online or Offline. If there are permission issues the status will be orange.
Router Listing Actions #

Router Health #
Click the heart icon to go to the router health page.
Speed Test #
Click the dial to go to the router speed test page.
Router Settings #
Click the wrench to go to router setting.
Port Forwards #
Click the arrow under router settings to go to the port forwards page.
Delete #
If you need to remove a device from your dashboard, click the trash icon button. Once the item is removed, it cannot be added again without Resetting the configuration on the router and adding it again from the Add Router process.


